Home

Monday, March 31, 2014

Empty Closets: Chapter 2

I was lucky as a child to grow up with a perfect back yard. Our house sat on the front half-acre which was landscaped with large patches of lawn, beautiful shrubs and trees, rose gardens, trellised vines, lovely flowerbeds, and a rustic arbor. The back half-acre contained fruit trees, berry bushes, grape vines, a vegetable garden, and . . . my playhouse. When I was about 9 years old, my sweet Dad roped my reluctant but obedient brother into helping him build me a play house. They designed it together, poured a concrete slab, framed it, and built it with reclaimed brick and recycled doors and windows. Mom furnished the inside with child-size furniture that we already had or that she created from scratch. She sewed curtains and cushions, and we accessorized it together. It was magical.

Unfortunately, our much smaller yard doesn't give me the option of building a playhouse for our grandchildren. Fortunately, there are those empty closets. . . . 

One of our bedrooms has an almost room-sized closet, complete with its own window. I considered making it into a sewing room, but I opted, instead, for the less practical but so-much-more-fun option of turning it into an indoor play house. 

Actually, the closet wasn't completely empty. Two of the walls were lined with shelves piled with my fabric and craft materials. However, there was still so much empty floor and wall space, so I began by hanging white sheets from the closet rods to cover up the clutter. (I suspect some day the children will realize that there is something behind those fabric walls, and I will walk in and find massive mayhem.)

Obviously, you don't need an empty closet to make this kind of a play space. A designated corner of any room can be transformed into all kinds of magical places--think pirate ship, tree house, fortress, etc. 

Then came the fun part:


I saw this stove/sink set at Target and bought it when it went on sale. I have seen similar ones at Ikea, toy stores, and garage sales. (There are also creative ideas online for making your own. Here are two sites that I think are fun:  http://www.thefarmersnest.com/2012/01/how-to-make-play-kitchen-set-out-of.html or http://ana-white.com/2009/11/plan-graces-playhouse-kitchen-stove.html) 

I love the red, white, and black and used it as my color scheme for the room. I found the "fridge" unfinished at a craft store, painted it white, added the handles, and drew a line across the front with a Sharpie to create the illusion of separate fridge and freezer doors. 

The fun is in the small stuff: 
The vacuum was a hand-me-down from my kind neighbor. (I wish it really worked; the children love to vacuum, and I could turn that chore over to them.)
I found the mixer and blender at Walgreens. (Elin's husband put colored puff balls in the blender so that the children can watch it work when they turn it on. Love it.)
The microwave and toaster are Salvation Army treasures.
Play food is in the bin under the oven.
Inexpensive pots and pans, utensils, and dishes are available all over the place. I have found them at resale shops, craft stores, garage sales, and in my own kitchen.


Elin had the fun idea of gluing a sheet of metal (Hobby Lobby) to the side of the fridge so that the children could have their own refrigerator magnets. The chalk board above the fridge is also a place that I can leave them messages.


The table and chairs were a very inexpensive, unfinished clearance find from JoAnn's that I painted with high gloss paint to match the sink counter top.


Mary Englebright-inspired fabrics were perfect for decorating--a valence for the window,


wall decorations,


and bedding. (My sister gave me a matching latch-hook rug kit that I will add when I finish it. Don't hold your breath.) In this corner, opposite the kitchen, the furniture includes a rocking chair that my sister made for the little mothers, a doll bed (Ikea), a wooden high chair (Tuesday Morning), and


this relic from that first play house.


Tuesday, March 18, 2014

No-Knead Hazelnut Bread

Last summer one of my kind sisters gave me a bag of hazelnuts that she had harvested from a tree in her yard. I brought them home, let them cure, and then went in search of a recipe that might replicate Kneader's hazelnut bread. Yum! I stumbled on this one, which isn't exactly the same and doesn't even call for hazelnuts. But I was intrigued by it, made it, and really like it. It has simple ingredients--no oil or sugar--and is easy to make.

The key to this bread is letting it rise forever. The recipe says 8 hours to overnight, but in my chilly downstairs, I have given it more like 18. I was worried that I would have to plan my life around it, but it seems happy to let me mess with it whenever I have the time. The end product is a dense, but delicious, artisan-type bread.

One other important note: before you try this, you need to be sure that you have something to bake it in. The recipe calls for a 14" to 15" long, lidded stoneware baker (I haven't even heard of such a thing), or a 9"x 12" oval deep casserole dish with cover, or a 9" to 10" round lidded baking crock. I don't have any of those, but I do have a pyrex-type, glass bowl (8" across and about 4" deep) with a lid. It works fine.

The recipe:

3 1/4 c. unbleached, all-purpose flour
1 c. whole wheat flour
2 t. salt
1/2 t. instant yeast
2 c. cool water
1 c. coarsely chopped pecans, walnuts or hazelnuts
optional: (I'm not a huge fan of dried fruit in bread, but I feel obligated to give you the option :)
3/4 c. dried cranberries
1/2 c. golden raisins

Directions:

Mix the flours, salt, yeast, and water in a large bowl. Stir, then use your hands to mix and form a sticky dough. Work the dough just enough to incorporate all the flour and then work in the nuts (and fruit). I just mixed it with my Kitchenaid until the flours were incorporated.

Cover the bowl with plastic wrap, and let it rest at room temperature overnight or at least 8 hours; it will become bubbly and rise quite a bit, so use a large bowl. (Like I said, it might take even longer depending on the temperature in your kitchen.)


Turn the dough out onto a lightly floured surface, and form it into a log or round loaf to fit into whatever you are going to bake it in. Place the dough in the lightly greased pan/bowl, smooth side up.

Cover and let rise at room temperature for about 2 hours, until it becomes puffy. It should rise noticeably, but it's not a real high-riser.


Place the lid on the pan/bowl, and put the bread in the cold oven. Set the oven temperature to 450 degrees.

Bake the bread for 45 to 50 minutes, then remove the lid and continue baking for another 5 to 15 minutes, until it's deep brown in color, and an instant-read thermometer inserted into the center registers about 205 degrees F.


Remove the bread from the oven, turn out onto a rack, and cool before slicing.


Enjoy!


Tuesday, March 11, 2014

DIY Alphabet Pocket Wall for Toddlers

Disclaimer: My level of sewing skills is definitely at the very bottom level of the "Beginner" classification. So don't judge me too harshly. Also, I am showing you a project that I haven't quite finished. That being said, those of you who are more experienced with a needle and thread and are more detail oriented than me will be able to make yours turn out way better than mine. (And mine is still cute!)


This is a really fun, easy, inexpensive project and my 18-month old girl is loving using it. Here's what I did:

1. I took a blue 40'' x 42'' piece of fabric (that I previously used as curtains) as a base for the project. Then, I used some patterned purple fabric (leftover from another project) for the pockets.

2. Using a rotary cutter and a cutting mat, I cut the purple fabric into twenty-six 5" x 5" squares.

3. Then, I ironed one white letter onto each purple square.(I found the iron-on letters at Walmart and to iron them on, you just follow the directions in the packet.)

4. Next, I found these cute colored shape buttons at Walmart and sewed one of each of the nine different shapes onto the purple squares that had A through K on them.

5. Then, I folded and ironed down a 1/4'' of material around the purple squares for the seam. I pinned the top seam to hold it in place (as shown in the picture below) and then sewed along the top seam using a sewing machine. (Sew a little and then back stitch. Then sew all the way across and then back stitch)--but only sew along the top seam for now. I did this for all of the purple squares.


6. Once all of the top seams were sewn, I pinned the purple squares onto the blue base fabric. You want to pin them so that the letter side is showing. You can space them however you want to. What worked best for me was having a row of six pockets on top and then a row of 7. Then a row of 6 pockets under that. And then a row of 7 again on the bottom. I left enough room between the rows for some letter flashcards to be put in the pockets without bumping into the row above them.

7. Once all the pockets are pinned into place, you are ready to sew them on. What worked best for me was starting in the top right hand corner of the pocket (remember to back stitch) and then sew down to the bottom right hand corner, taking the pins out before you get to them with the needle. Making sure the needle is still in the fabric, lift the presser foot and then turn the fabric so that you can sew along the bottom seam. Once the fabric is in position, put the presser foot back down and sew along to the bottom left hand corner. Making sure the needle is still inserted into the fabric, lift the presser foot and then turn the fabric so you can sew along the left side of the pocket. Once the fabric is in position, put the presser foot back down and sew along to the top corner of the pocket. Back stitch, and you are done! Repeat this step for every pocket.


Like I said, I am not adept with a sewing machine yet, but this was a pretty simple, worry-free project for me. The sewing part actually went pretty quickly for me. But the ironing and pinning does take some time. I would say that the entire thing took me about 6 hours.

Once your project is done, there are several activities you can do with your child. Here are some ideas:

- Letter recognition and sounds: Get some alphabet flashcards and have your child put each card in the pocket with the corresponding letter. You could do this with anything that is shaped like a letter and that will fit in the pockets. We have used letter magnets and letter-shaped cookie cutters. At some point, you can even give them objects and have them put the object in the pocket with the letter that is the first letter of the name of the object. Like a ball would go in the B pocket, etc.

- Shape recognition: Have your child look through the remaining shape buttons and put the star buttons in the pocket with a star on it--and the square buttons in the pocket with a square on it, etc. Again, you can do this with any shapes that will fit in the pockets. Small cookie cutters work well.

- Color recognition: I have 5 different colored buttons on my pockets so you could also do some color activities and have your child put different colored objects in the pocket with the matching colored button.

- Number recognition: I am thinking that I will sew some numbers on the last two rows of letter pockets. Then you could do the same thing with numbers. You could have them count out 5 marbles or buttons or objects to put into the pocket with a 5 on it, etc.

Anywho, those are some ideas.

I actually got this idea from a quick glimpse I saw of something similar in the video below. If you pause the video at :56 seconds and again at 1:44 you will get a good view of it. (The one in the video is MUCH cuter than mine...In fact, the entire house in the video is amazing. So maybe it will inspire you to go above and beyond my simple pocket wall.)


Apart from the video being a springboard for cute learning activities, I also appreciate the perspective it gives on parenting. I love being a mother. And being an earthly parent certainly has given me more perspective on what it means to have a Heavenly Father who loves me and all of His children. Enjoy the project and the video!


Wednesday, March 5, 2014

DIY Nursery

It's official! As of Sunday, I became 37 weeks pregnant, which means that little Sour Patch is officially full-term! Hooray! Since I have the good luck to still have energy while the size of an orca, I'm trying to convince myself to keep "nesting" until the end and finish the less desirables on my "To-Do Before the Baby Comes" list. Pack hospital bag? Check. Pediatrician? Found. Taxes? Eh, mostly done but requiring a look-over from my thorough husband, lest I inadvertently get us in trouble with the IRS...

Yet one thing I've finally accepted will not be "done" and crossed off the list before my baby shows up is the nursery. I think I'm going to have the itch to keep adding to and beautifying this dwelling spot in the months to come. Nonetheless, it's pretty cute as is, and I want to document it in its relatively clean glory before baby bedlam ensues. So without further ado, I present...

Laurel's DIY Nursery

We begin, with the DIY Nursery Glider, courtesy of Free Stuff on Craigslist and my mother's mad sewing skills...


Followed by the DIY photoboard, courtesy of an old cork board, leftover fabric, and Walmart ribbon...


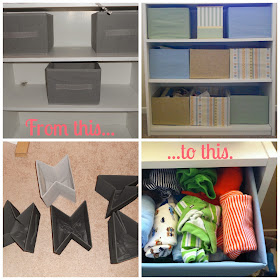
Next, we have our DIY Faux Storage Cubes Shelves

Here's the thing: those actual cube shelves of similar size cost $40ish at Target, and the fabric cubes are $6 a pop. Multiply that 9 times and add in tax? That's well over $100, which is fine except for the fact that I don't want to spend that much. Instead, we re-purposed the $20 Walmart bookcase we already owned and used $2 cubes from Big Lots. Then, mama sewed matching cube-covers with leftover nursery fabric and voila! Super cute storage.


Though I wanted to use a dresser for a changing table, I also didn't want to rent a truck to haul it around. So, I decided to put out a "Wanted" request on Freecycle for just the regular kind. A wonderful neighbor offered me hers, and one coat of non-VOC paint from Walmart later, it was good as new! (Oh, and by the way, a classic changing table doesn't fit inside my car either... whoops. Thanks Marie and Landes for helping me pick it up!)


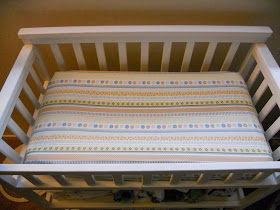
And then there's all the DIY sewing! My one contribution (of which I am immensely proud) is the changing pad cover! I slightly modified this tutorial to make it, and I feel pretty victorious about it.


My mother sewed the crib skirt, pillow, and curtain... all without a pattern, because she's just that good.


And my mother-in-law got me this cute tissue box cover! It's the little things that make me happy...


So there's still some work to be done. I want something cute to hang above my crib and should probably find some bins for my changing table shelves. Yet overall, I'm immensely happy with my little nursery and am ready for D-Day!