Home

Thursday, February 27, 2014

Empty Nest. . . Means Empty Closets :)

Over the last three years, my husband and I have gone from having a full house--nine people--to an empty nest. Big adjustment! Suddenly we have empty rooms and, naturally, empty closets. I am trying not to fill them up with random stuff, but I am enjoying the opportunity to use some of the extra space creatively.

I loved dolls as a child. I had dolls of all shapes and sizes, and my oh-so-talented (and patient) mother sewed beautiful clothes for them, including tiny, detailed, Barbie dresses. (Some of them survived both me and my girls and are now being used by her great, grand-daughters.) I spent hours creating homes, furniture, and accessories for those dolls.

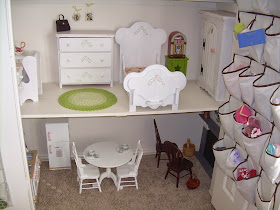
Later, when Delys, Elin and Laurel started playing with dolls, I had the chance to sew and plan and build all over again. When they outgrew the doll-phase, I boxed up their favorite things to keep them for their daughters. Long story short, with the help of my kind and skillful brother-in-law, I recently turned the bottom half of the game closet in our family room into a two-story town house for 18 inch dolls.

We measured and marked a line 24" up from the floor and screwed boards into the walls along that line to act as braces for the "floor boards," which we made from scrap boards cut to fit the space. (You could also use plywood.) We used two boards and joined them together on the bottom with some metal braces and a single, perpendicular board in the middle for added stability.


Support Braces
You can see the water stains on the bottom of the  boards, but once we primed and painted them, the tops looked great.

Below are some pictures of the different "rooms" and their furnishings:
The Living Room
If you read this blog regularly, you will soon discover that I love bargains (code for "I'm cheap"), so almost everything in this doll house was either homemade or bought on clearance. The chairs and all the accessories in the living room were gleaned from bargain bins or at resale shops.

The Fireplace

The fireplace started with the mantle, a small wooden shelf I found in the clearance aisle at Michael's. The other pieces were wood scraps I had at home and cut to size--except the white corner pieces which I bought, pre-painted, from Home Depot. (You don't need fancy tools; I used a hand saw with a miter box to keep the lines straight.) I simply cut the pieces, painted them with inexpensive acrylic paint, and then glued them in place.

Kitchen

I bought the kitchen on sale at Target. I loved the details--doors and drawers that open, knobs, burners, cupboards, burners, facets, etc. The pot on the stove was actually a Christmas tree ornament that I found after Christmas. The mop in the corner is a baster that I grabbed from a clearance bin at the grocery story. You can find little tea sets in all shapes and sizes and price ranges--including at dollar stores.

Dining Area

I found the dining table and chairs on sale at Tuesday Morning, but I have also seen unfinished tables at craft stores, and the last time I was at Salvation Army, I saw someone walk out with a wooden cake stand that would have made an adorable table. The shelf on the wall was another under-a-dollar clearance find that I painted and hung.


Second Floor Bedroom
One of my sweet sisters made the bed years ago for the girls with her scroll saw. I bought most of the other bedroom furniture unfinished at different times at craft stores. White paint and green and peach stenciling on each piece helped bring them all together. The wardrobe had shelves but no hanging rod, so I added one by drilling a small hole part way into each side of the inside of the wardrobe, cutting a wooden dowel to length, and gluing it into place. The rug is a placemat (found at Kohls on clearance, of course). I love the jukebox on the bedside table, an after-season birdhouse that I found for 90% off at Walgreens.


I hung a shoe rack on the door to hold clothes, shoes, and accessories. 

The house is ready. The dolls are excited. Can't wait for the grand-daughters to come!

P.S. . . . .

A friend pointed out that it would be easier to visualize with a doll in it. (Sorry, I should have thought of that.) So here are a few pictures, with a doll, that will hopefully show the scale a bit better:

 In the bedroom. . .

And the kitchen. . .

And the living room. . .

 And while we're at it, the bathroom.  Because floor space is limited in the closet townhouse, you can store additional items on the shelves when they aren't in use, and then pull them out to create additional rooms in the space around the closet. I bought this tub, complete with plastic bubbles, at a thrift store.

 The backyard or the park. I found the trellis at a dollar store and wound it with ivy--also from a dollar store--to create an outdoor backdrop. Like most of the wooden furniture, the bench came, unfinished, from a craft store. I bought the metal birdbath at the end of the season at Hobby Lobby, and the pram is a thrift store find. I think it is actually quite old--a fun treasure.

Another view of the garden.

This is the longest blog ever--sorry :)


Monday, February 17, 2014

Chocolate-Coconut-Nutty Granola

Like Laurel and Elin, I find that some of my all-time-favorite foods are from recipes that I sort of stumbled upon and then tweaked to my taste. One of those is my go-to breakfast: homemade chocolate/coconut/nutty granola.

I found the original recipe in an advertisement/coupon booklet from Kroger, a local supermarket. (They credit the recipe to Chef Caitlin Steininger.) I made it and liked it, but I felt like I could spruce it up to make it both more nutritious and delicious. To be honest, I can't give you a rundown on its nutritional values, but it is made up of simple, healthy ingredients. And since it is made from scratch, it has no preservatives, and you have the flexibility to adjust it to your individual taste. For example, by choosing milk-free chocolate chips and leaving out the wheat germ, Elin was able to adapt it to her gluten/soy/dairy free diet.

Preheat oven to 350 degrees. Line two large cookie sheets with foil.

In a large bowl, mix together:

8 cups old fashioned oatmeal
1 cup coconut
1 cup chopped walnuts, pecans, or almonds
1/2 cup wheat germ
(You can also throw in flax seeds, sunflower seeds, pumpkin seeds, or anything else that sounds crunchy and delicious.)

In a small bowl, stir together:
1/2 cup vegetable oil
1/2 cup honey (I soften the honey for a few seconds in the microwave to make it easier to mix with the oil.)

Pour over oatmeal mixture and stir well. Spoon granola onto cookie sheets and spread evenly.


Bake for 16 to 20 minutes. (In my oven, 18 minutes is perfect. I am able to cook both pans at once by rotating the pans between the lower and upper racks at the 9 minute mark.)

While the granola is cooking, measure out 3/4 to 1 cup mini, semi-sweet chocolate chips. (You can use regular size chips and chop them up; using the minis just saves you a step.)

When the granola comes out of the oven, carefully pour/scrape the granola from one of the cookie sheets back into the original bowl. Stir in half the chocolate chips. Add the second pan of granola and the rest of the chips. Stir.

Chocolate-Coconut-Nutty Granola


Let cool. Store in an airtight container. Add milk (or not) and enjoy!

Chocolate-Coconut-Nutty Granola


Saturday, February 15, 2014

When Life Gets Tough and the Tough doesn't seem to get going...

There is a song in our hymnbook at church that is virtually unknown. The only reason I ever came across it is because a few years ago, a coworker (and friend) showed me a beautiful vocal arrangement that Rob Gardner had done of it. Gardner changed the melody completely, but the words are the same. Listening to this arrangement has brought me peace and hope when life has been hard. Below is a short video I made using Rob Gardner's arrangement and some photos that are meaningful to me. The song is called "Come Ye Disconsolate."


Come, ye disconsolate, where'er ye languish;
Come to the mercy seat, fervently kneel.
Here bring your wounded hearts; here tell your anguish.
Earth has no sorrow that heav'n cannot heal.

Joy of the desolate, Light of the straying,
Hope of the penitent, fadeless and pure!
Here speaks the Comforter, tenderly saying,
"Earth has no sorrow that heav'n cannot cure."

Here see the Bread of Life; see waters flowing
Forth from the throne of God, pure from above.
Come to the feast of love; come, ever knowing
Earth has no sorrow but heav'n can remove.

Text: Thomas Moore, 1779-1852. Verse three, Thomas Hastings, 1784-1872

Monday, February 10, 2014

Valentine's Day Post Office

With Valentine's Day around the corner, I have been scrambling to find ways to make the week special for my husband and little girl. One thing I have done in the past that has worked well has been hanging up this little family post office box.


My mother actually found a few of these wooden letter holders on clearance somewhere. Before we jazzed them up a bit, they had a tile with a picture of a rooster in the center--but with a little mod podge, fancy paper, and some doo-dads from Hobby Lobby, we turned them into a fun way to get notes and treats from each other. 

Here is how it works: Each person in the house has a tag with their name on it. All of these hang on the left hook. When you place a note or treat in the box, move the receiver's name to the right hook. That is how they know that "they have mail." Once they take the note/treat out of the box, they move their tag back onto the left hook. 

If you are interested in making one like this, check stores like Ross, TJ Maxx, and Hobby Lobby for similar letter boxes. If you want a letter box almost identical to the one pictured above, you can search for "wooden letter holder with key hooks" at amazon.com and some almost identical options are available for purchase.

Instructions

1. Measure the tile square in the center of the letter box and write down the dimensions. Using a ruler, draw a square with those dimensions on two pieces of paper of your choosing. (I used a patterned paper for the bottom square, and a solid paper for the top square.) Cut out both squares.  

2. Using a sponge brush, cover the tile square with a thin layer of mod podge. Place the paper square that you want as the bottom layer on the tile square. While the mod podge is drying, take your second square of paper and measure and cut off about a 1/4'' off of the bottom and 1/4'' off of one side of the square. 

3. Using the sponge brush, cover the back of the small square paper with a thin layer of mod podge and then place it so that it is centered on the base square (that is now attached to the letter box). 

4. Once the mod podge is dry, take the sponge brush and cover the small square and what you can see of the base square in a thin layer of mod podge.

5. When the mod podge is dry, apply whatever doo-dads you want--like these awesome letters and pearls pictured below. Embellish!
 

6. As for the name tags, at Hobby Lobby, we found these black and white circles to use as bases, and some bright, colorful circle tags to glue on top of them. 


7. To finish it off, punched holes in the base circles and tied some loops of black and white string to them so that they could hang easily from the key hooks. 

Happy V-day!


Monday, February 3, 2014

Baby on a Budget

You know, contrary to common consensus, so far my third trimester has been a lot more enjoyable than my second. My back stopped hurting, my nausea went away (again... hopefully for good this time!), and my sleep has improved by leaps and bounds. Plus, my pregnancy cravings have decided that the one thing I need more than anything else is smoothies. Shockingly healthy, right? I mean, they're not steamed vegetables (which still make me want to gag, by the way,) but a homemade fruit smoothie is still a large improvement over the chocolate and ice cream I dreamed of the past 7 months.

Strawberry-pineapple-mango-banana smoothie. Delish...

Friends have warned me that babies are quite expensive little people. This seems to be true. After all, those pregnancy blood tests alone are over $80 a pop, not to mention the $800 ultrasound my insurance didn't deem it necessary to cover. Basically, I'm braced for an expensive delivery, higher monthly insurance costs, and lots of doctors appointments for the little one; that all seems unavoidable.

But what about all this baby stuff? Seriously, the list of baby "essentials" is long and full of silly words, like "snuzzler," "boppy," and "bumbo." Not only do they sound Dr. Seussish, they also end up costing a lot if you buy them new. Since my husband and I are poor first-time parents, I knew from the start that I wanted to have this baby on a budget, and my eyes were peeled for good deals since day one. Here are the results of my epic quest for frugality:

Discoveries Made on my Epic Quest to Have this Baby on a Budget:

1. There is a ton of free stuff available. After all, babies grow out of all this stuff pretty quickly, and I've found that parents are really generous at just giving away their used items. It seems like swings, strollers, bouncers, and what-not all take up quite a bit of space, too, so I can understand why moms want to clear out these space-consuming contraptions as soon as possible. A list of free items I've gotten include:
    • Bumbo seat
    • Boppy pillow
    • Fisher Price Swing
    • Fisher Price infant seat
    • Graco Stroller
    • Glider with footrest
    • Futon
    • LOTS of baby clothes
Ok, so a futon isn't exactly a baby necessity, but with a mother and mother-in-law planning to come visit, it seemed like a good addition. Where did I find all these gems?
    • Craigslist.org. This is where I found a lot of my items. I had no idea there was a "free stuff" section; in fact, I'd never used craigslist at all until we were pregnant. It also has the nice feature where it lists upcoming garage sales where people are selling baby items. My glider, swing, lamb seat, and bumbo were all acquired for free from this site. (Of course, use good judgment when meeting with strangers, folks.)
    • Freecycle.org. Some friends alerted me to this website. It is basically a craigslist where everything is free. You join groups by city and receive emails about what other freecyclers are donating. There's also the option to request items; I know two moms who got gobs of baby items simply by requesting "Baby Stuff."
    • Church Item Swaps. I think these are such a good idea, whether it's a literal gathering where everyone brings their items to the church building or an online exchange. It seems like the women in my congregation are always sending out emails that they are giving away their used baby gadgets. 
    • Friends and Family. I guess this one is obvious, but I'm so grateful for these resources! I don't  mean the gifts new moms get at baby showers (though those are simply wonderful, too!) I mean the giant suitcase-full of baby and maternity clothes I inherited from my sisters, the futon our friends gave us, and the stroller from a fellow church member. 
2. If you can't get it for free, you can probably get it used. Again, craigslist was my go-to spot for used items, but people who actually get up/get dressed on Saturdays seem to love garage sells. I bought my Graco Pack 'n Play and my jogging stroller secondhand.

3. If you want it new, look early for deals! I was successfully suckered into deciding I needed a new crib, crib mattress, and car seat. I know there's debate on all those things, but for my peace of mind, I just needed to buy them new. My awesome neighbor loaned me this Baby Bargains book that rates various baby brands for just about everything. It's supposed to help you get the best bang for your buck, and it actually has a ton of information. Anyways, it influenced my buying decisions: I got my crib at Ikea for $100. Even though that's really inexpensive for a crib, I felt guilty about it until I saw this crib at the American Girl store:


It's cute, right? It also cost $115. That's right; this crib for a doll cost more than my crib for a person.


So I don't feel guilty anymore. The mattress is a foam one from Walmart.com for $36. As for the car seat? We got our Graco Snugride 30 at Target for $65. The same one sells online for $129.99. How did that happen? I... have no idea. It didn't seem like it had been opened. It didn't have a special price tag, nor was it advertised to be on sale. Still, I'm glad I researched car seats beforehand to know that a) this was the one I wanted and b) it was a steal of a price!

4. DIY Which, in this case, mostly means have my mother do-it-herself. She used her sewing wizardry to make a matching crib skirt, curtain, and pillow. Then, she recovered my glider from craigslist (which you can see here.) Then, she sewed coordinating covers for the little boxes I use to stash Sour Patch's stuff. It was free labor given with love, and the result is so much cuter than any expensive set I could buy. I did manage to make one thing myself: a photo board using an old cork board, leftover fabric, and Walmart ribbon.

Though I'm feeling mostly set for Sour Patch's arrival, my quest for frugality in all things baby continues. I've become an Amazon Mom (which is free if you have Amazon Prime) and already received a $25 promotional credit towards diapers. I'm contemplating becoming a Costco member. I'm planning on trying the 6-month free trial of Google Shopping Express. Any other tips?

Basically, I feel like I'm becoming more and more like my mother... which can only be a good thing.